
2 posts tagged with "Hal9"

View All Tags

Solving Math Problems with Precision: Python Code Execution with E2B and Hal9

· 4 min read
Generative AI Engineer

Overview

In the world of large language models (LLMs), generating accurate and precise answers to math problems can be challenging due to hallucinations and inherent limitations in numerical reasoning. By integrating Python code execution into the LLM workflow, we can greatly enhance precision and reliability. This guide demonstrates how to combine the power of E2B’s sandboxed Python execution with Hal9 to create a robust Math Problems Resolver.


Build a Math Resolver step by step

1. Environment Setup and Initialization

The first step involves setting up the required environment by importing necessary libraries, loading environment variables, and initializing API clients. This ensures that both Hal9 and E2B are ready to work together.

from e2b_code_interpreter import Sandbox
from dotenv import load_dotenv
from openai import OpenAI
import os
import json
import hal9 as h9

load_dotenv()

E2B_API_KEY = "YOUR E2B API KEY"

if E2B_API_KEY == "":
print("You need to register in e2b -> https://e2b.dev/ and get your API key to use this chat")
else:
# Initialize OpenAI client with Hal9 proxy
openai_client = OpenAI(
base_url="https://api.hal9.com/proxy/server=https://api.openai.com/v1/",
api_key=os.getenv("HAL9_TOKEN")
)

2. Defining the Python Code Execution Tool

To enable LLMs to execute Python code, we define a tool that describes the functionality required to run code snippets. This tool bridges the gap between the LLM’s language understanding and actual Python code execution for solving math problems.

# Define tool for executing Python code
tools = [{
"type": "function",
"function": {
"name": "execute_python",
"description": "Execute Python code in a Jupyter notebook cell for solving math problems.",
"parameters": {
"type": "object",
"properties": {
"code": {
"type": "string",
"description": "Python code to compute the math problem."
}
},
"required": ["code"]
}
}
}]

3. Message Management

The code below demonstrates how to manage the conversation by loading previous messages, setting up an initial system prompt, and appending new user inputs.

# Load previous messages or initialize an empty list
messages = h9.load("messages", [])

# Add initial system message if messages list is empty
if len(messages) < 1:
messages.append({
"role": "system",
"content": "Math Problems Resolver: Ready to solve your math challenges using Python code execution."
})

# Append user input to messages
user_input = h9.input()
messages.append({"role": "user", "content": user_input})

4. Integrating Python Code Execution via E2B Sandbox

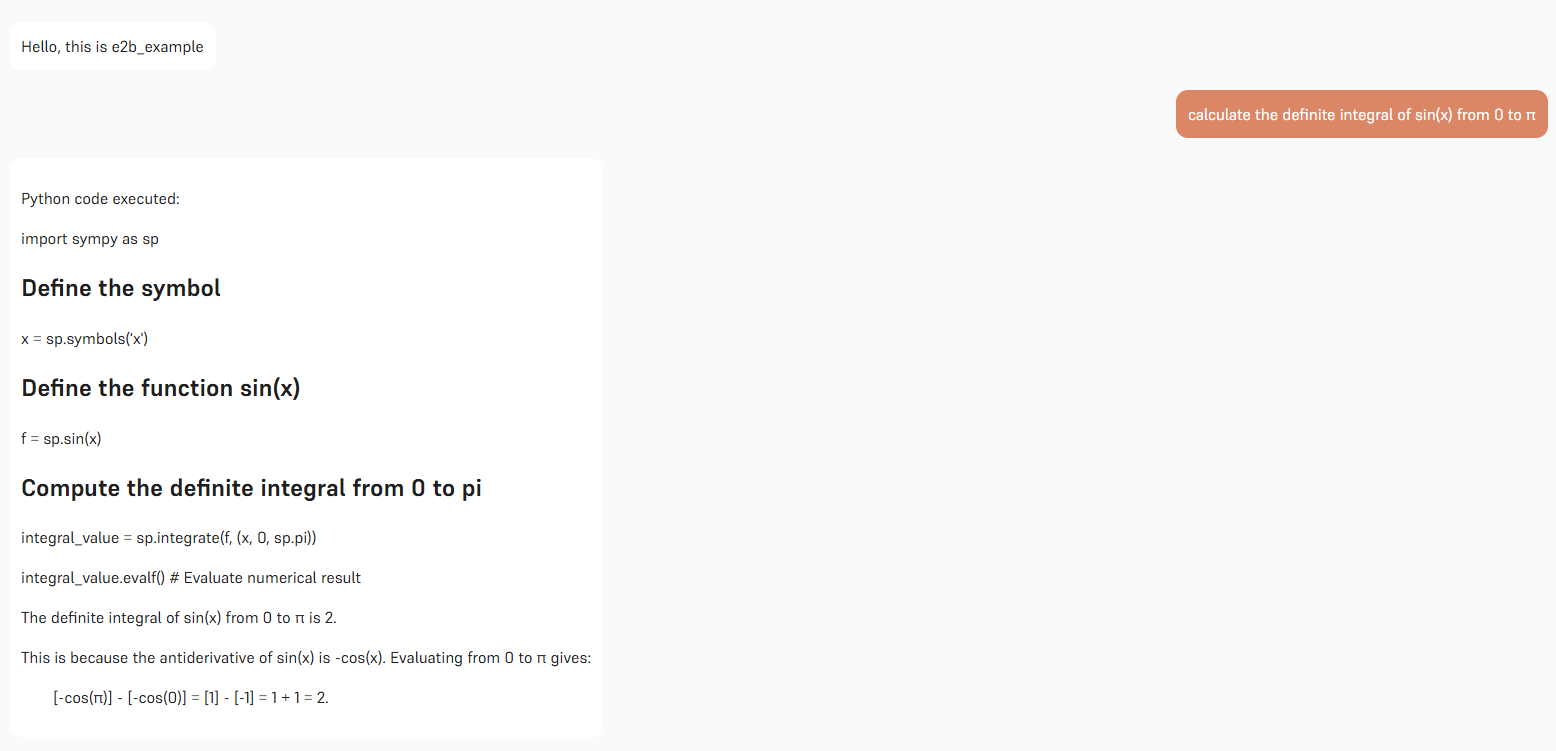
To reduce hallucinations and increase precision in mathematical computations, the LLM can call the execute_python tool. When invoked, the code is executed in a secure E2B sandbox environment, ensuring accurate results and safe code execution.

# Get response from OpenAI with tool usage enabled
response = openai_client.chat.completions.create(
model="o3-mini",
messages=messages,
tools=tools,
tool_choice="required"
)

# Process response and execute tool calls if any
response_message = response.choices[0].message
if response_message.tool_calls:
for tool_call in response_message.tool_calls:
messages.append({
"role": "assistant",
"tool_calls": [{
"id": tool_call.id,
"type": "function",
"function": {
"arguments": tool_call.function.arguments,
"name": tool_call.function.name,
},
}]
})
if tool_call.function.name == "execute_python":
# Execute Python code in a sandbox environment
with Sandbox(api_key=E2B_API_KEY) as sandbox:
code = json.loads(tool_call.function.arguments)['code']
print(f"Python code executed: \n\n ```{code}```\n")
execution = sandbox.run_code(code)
result = execution.text

# Append the execution result to messages
messages.append({
"role": "tool",
"name": "execute_python",
"content": result,
"tool_call_id": tool_call.id,
})
else:
messages.append({
"role": response_message.role,
"content": response_message.content
})

5. Finalizing the Response

After processing tool calls and executing the Python code, the conversation history is updated and saved. The final response is then generated, ensuring that users receive precise and context-aware solutions to their math problem

# Save messages and get the final response
final_response = openai_client.chat.completions.create(
model="o3-mini",
messages=messages
)

final_response_message = final_response.choices[0].message
messages.append({
"role": final_response_message.role,
"content": final_response_message.content
})
print(final_response_message.content)
h9.save("messages", messages)

The Power of Python Execution in Math Problem Solving

By integrating Python code execution into the LLM workflow:

  • Precision is Enhanced: Executing actual code reduces the risk of hallucinated results, especially in complex math computations.
  • Reliability is Boosted: The E2B sandbox provides a safe and controlled environment to run code, ensuring that the results are accurate.

Experience the power of integrating Python code execution with LLMs. Whether you're tackling complex equations or simply exploring math problem solving, this setup is designed to deliver reliable results. Try it here.

Complete code on GitHub: Hal9 e2b Repository.


Conclusion

The fusion of E2B��s secure Python code execution and Hal9’s interactive chat interface provides a groundbreaking approach to reducing hallucinations in math problem solving. By executing code on-demand, this system bridges the gap between language models’ conversational abilities and the precision of programmatic computation.

References

Smarter Chatbots on Hal9 with Burr: A Step-by-Step Guide

· 7 min read
Data Scientist

When building chatbots, among many others concerns, one often faces three main challenges: stability, precision, and deployment. In this blog post, we'll explore how a new Python framework, Burr, combined with Hal9's capabilities, can make these challenges a thing of the past.

Why these three matter so much:

  • Stability: A stable chatbot ensures consistent performance and reliability, even when handling complex inputs or high user traffic. Instability can lead to frustrating user experiences, which may damage trust in your product.

  • Precision: AI agents frequently hallucinate, which makes accuracy and relevance critical for deploying applications at an industry-ready level.

  • Deployment: getting your chatbot out of the development environment and into production smoothly is often a challenge. Deployment should be seamless, scalable, and adaptable to your existing infrastructure.

Introducing Burr

Burr is a lightweight Python framework for building tool-using AI agents, simplifying the creation of chatbots that can interact with APIs, databases, or custom tools. With Burr, you can:

  • Quickly prototype, test and debug agents with minimal effort.

  • Integrate external tools and APIs seamlessly.

  • Build multi-step workflows for more complex tasks.

  • Visualize the decisions each agent makes and see how they communicate to each other.

By combining Burr with Hal9's user-friendly platform for deploying AI-powered solutions, you can build chatbots that are not only intelligent but also robust and production-ready.

The Hal9 Advantage

When you pair Burr with Hal9’s powerful AI deployment platform, you unlock a streamlined path to creating production-ready chatbots. Hal9 makes it easy to:

  • Deploy with Confidence: Transition seamlessly from development to production with minimal friction.

  • Scale Effortlessly: Handle high user traffic without compromising stability or precision.

  • Simplify the Process: Hal9’s platform is designed with accessibility in mind, making it easy to deploy even the most complex agents.

Example: Burr on Hal9

Let's walk through how to build a simple weather chatbot on Hal9 using Burr. This chatbot can interact with external tools to provide precise and relevant responses to user queries.

1. Set Up Burr

Start by installing Burr and creating a basic agent.

pip install burr

2. Create Tools

Next, implement a few tools for the agent to use. In our case, we chose to use OpenWeatherMap's API to fetch weather data. Our tools include:

  • get_current_weather: Fetches the current weather conditions for specified coordinates.

  • get_weather_forecast: Retrieves the weather forecast for the next few days for given coordinates.

  • get_coordinates: Resolves a location name into geographic coordinates (latitude and longitude) to query the weather API accurately.

Each of these tools uses OpenWeatherMap's API to gather precise weather information, whether it's real-time conditions or forecasts.

3. Implement the chatbot's logic with Burr

With the tools ready, it’s time to define the chatbot’s logic. Burr allows you to construct multi-step workflows where agents can dynamically select and execute the right tools. Below is the full implementation:

Click here to view the full code
import hal9 as h9
import json
from openai import OpenAI
import os

from burr.core import ApplicationBuilder, State, default, expr
from burr.core.action import action

## Import user-defined API functions for the agents to use
from weather_utils import *

client = OpenAI(
base_url="https://api.hal9.com/proxy/server=https://api.openai.com/v1/",
api_key = os.environ['HAL9_TOKEN']
)

## Burr actions are encapsulated, stateless operations triggered by state
## transitions, defined to interact with workflows, models, or external APIs.
@action(reads = [], writes = ['messages'])
def user_input(state: State) -> State:
prompt = input()
message = {
'role': 'user',
'content': prompt
}

return state.update(prompt = prompt).append(messages = message)

@action(reads = ['messages'], writes = ['response'])
def orchestrator(state: State):
system_prompt = (
"You are a helpful agent."
"You work for an app specialized in giving meteorological information to users."
"Your task is to decide if the last users query needs to be answered using the weather API."
"If so, your reply should only be 'API'. If not, you can reply freely to the user."
)
message = {'role': 'system', 'content': system_prompt}

response = client.chat.completions.create(
messages = [message] + state['messages'],
model = 'gpt-3.5-turbo'
).choices[0].message.content

return state.update(response = response)

@action(reads = ['messages', 'prompt'], writes = ['location', 'request_type', 'count'])
def interpret_prompt(state: State) -> State:
system_prompt = (
"You are a geography expert."
"Your task is to find the specific location from where the user is requesting weather data.")

## More left out (big system prompt and response format) for brevity ...

response = client.chat.completions.create(
model = 'gpt-4o-2024-08-06',
messages = state['messages'] + messages,
response_format = response_format
).choices[0].message.content

return state.update(**json.loads(response))

@action(reads = [], writes = ['prompt'])
def ask_location(state: State) -> State:
reply = 'The location is unclear, please try again with a different prompt.'
print(reply)

new_state = state.append(messages = {'role': 'assistant', 'content': reply})
h9.save('messages', new_state['messages'], hidden = True)

return new_state

@action(reads = ["location"], writes = ['lat', 'lon'])
def coordinates(state: State) -> State:
info = get_coordinates(state["location"])[0]
return state.update(lat = info['lat'], lon = info['lon'])

@action(reads = ["lat", "lon"], writes = ["weather_result"])
def current_weather(state: State) -> State:
info = get_current_weather(state["lat"], state["lon"])
return state.update(weather_result = info)

@action(reads = ["lat", "lon", "count"], writes = ["weather_result"])
def weather_forecast(state: State) -> State:
info = get_weather_forecast(state["lat"], state["lon"], cnt = state["count"])
return state.update(weather_result = info)

@action(reads = ["prompt", "weather_result"], writes = ["messages"])
def interpret_result(state: State) -> State:
result = json.dumps(state["weather_result"], indent = 2)
system_prompt = (
"You are an expert meteorologist."
"Your task is to interpret the asistants weather response and reply the requested information to the user."
)
messages = [
{'role': 'system', 'content': system_prompt},
{'role': 'user', 'content': state['prompt']},
{'role': 'assistant', 'content': result}
]

response = client.chat.completions.create(
model = 'gpt-3.5-turbo',
messages = messages
).choices[0].message.content

new_state = state.update(response = response).append(messages = {'role':'assistant', 'content': response})
h9.save('messages', new_state['messages'], hidden = True)

return new_state

@action(reads=['response'], writes = [])
def reply(state: State) -> State:
print(state['response'])

return state

## Now create the app. A simple as adding all actions,
## and defining how they are related to each other!
app = (
ApplicationBuilder()
.with_actions(
user_input,
orchestrator,
interpret_prompt,
ask_location,
coordinates,
current_weather,
weather_forecast,
interpret_result,
reply)
.with_transitions(
("user_input", "orchestrator"),
("orchestrator", "interpret_prompt", expr("'API' in response")),
("orchestrator", "reply"),
("interpret_prompt", "ask_location", when(location = 'uncertain')),
("interpret_prompt", "coordinates"),
("coordinates", "current_weather", when(request_type = 'current')),
("coordinates", "weather_forecast"),
("current_weather", "interpret_result"),
("weather_forecast", "interpret_result"),
("interpret_result", "reply"))
.with_state(
messages = h9.load('messages', [{'role': 'assistant', 'content': "Hi! 🌤️ I'm your weather assistant. Tell me a location, and I'll share the forecast with you! ⛅"}]))
.with_entrypoint("user_input")
.build()
)

app.run(halt_after = ['ask_location', 'reply'])

One of Burr’s standout features is its ability to visualize your chatbot’s flow with just a single line of code. This visualization provides a clear overview of how your chatbot’s tools and actions are interconnected. By running

app.visualize("graph.png")

You’ll generate a graphical representation of the workflow, similar to this:

This feature is invaluable for debugging, optimizing workflows, or simply understanding how your chatbot processes user queries.

4. Deploy to Hal9

As mentioned earlier, deployment can often be one of the trickiest parts of building a chatbot. But Hal9 eliminates this complexity. With Hal9’s platform, deploying your Burr-powered chatbot is as simple as running a single command in your terminal:

HAL9_TOKEN=ADDYOURTOKEN hal9 deploy . --name weather_chatbot

This command packages your chatbot and makes it production-ready within seconds. Hal9 handles the heavy lifting, so you can focus on refining your chatbot and delighting your users.

With Burr’s intuitive development tools and Hal9’s effortless deployment capabilities, building and launching intelligent chatbots has never been easier.

Test the Weather Chatbot

Want to see the chatbot in action? We’ve deployed it using Hal9 so you can experience its capabilities firsthand. Click the link below to try it out and see how seamlessly Burr and Hal9 work together: Try the Weather Chatbot on Hal9